


This article deals with basics of:
Running a Kafka broker on your local machine.
Set up a minimal Spring Boot app to send/receive messages via Kafka.
Set up a Python producer/consumer to send/receive messages via Kafka.
Note: Upon completion of step 3, we would have established communication between a Spring Boot App and a Python module via Kafka.
Pre-requisites
Set up the following (instructions on respective websites depending on your underlying OS):
JDK 21 - https://www.oracle.com/in/java/technologies/downloads/
IntelliJ Community Edition - https://www.jetbrains.com/idea/download/other.html
Kafka 3.7.0 - https://kafka.apache.org/downloads
Python 3.12 https://www.python.org/downloads/release/python-3122/
Cygwin (optional) - https://www.cygwin.com/install.html This is a Linux emulator for Windows (I prefer using Linux commands)
ConEMU (optional)- https://conemu.github.io/ (Allows Cygwin to run in a tabbed manner. I prefer managing multiple tabs vs multiple windows)
Visual Studio Code - https://code.visualstudio.com/
Python 3.12.2 - https://www.python.org/downloads/
Starting Kafka locally
Extract the Kafka .tar file to a suitable directory. I extracted mine at E:\Software\kafka_2.13-3.7.0
We'll be starting Zookeeper and then the Kafka broker. We could also start Kafka in KRaft mode that doesn't depend on Zookeeper but that's out of scope for this article.
I highly recommend reading the following to gain a better understanding of the rest of the post:
Starting Zookeeper
If you run Zookeeper using the following command on Windows without any modifications to properties files, you might run into the following issue :
$ bin/zookeeper-server-start.sh ./config/zookeeper.properties
[2024-03-08 17:10:20,474] ERROR Invalid config, exiting abnormally (org.apache.zookeeper.server.quorum.QuorumPeerMain)
org.apache.zookeeper.server.quorum.QuorumPeerConfig$ConfigException: Error processing ./config/zookeeper.properties
at org.apache.zookeeper.server.quorum.QuorumPeerConfig.parse(QuorumPeerConfig.java:198)
at org.apache.zookeeper.server.quorum.QuorumPeerMain.initializeAndRun(QuorumPeerMain.java:125)
at org.apache.zookeeper.server.quorum.QuorumPeerMain.main(QuorumPeerMain.java:91)
Caused by: java.lang.IllegalArgumentException: dataDir is not set
at org.apache.zookeeper.server.quorum.QuorumPeerConfig.parseProperties(QuorumPeerConfig.java:424)
at org.apache.zookeeper.server.quorum.QuorumPeerConfig.parse(QuorumPeerConfig.java:194)
To resolve this, change the dataDir property in the file <kafka root folder>\config\zookeeper.properties to a directory that is appropriate for the underlying OS. In my case, I created the following folder e:\tmp\zookeeper and updated dataDir property to:
dataDir=e:\tmp\zookeeper
Re-run the start command, and Zookeeper should start and console should look like below (Note: I have renamed the ConEMU tabs to be able to easily identify the running processes):

Starting the Kafka broker
Before starting Kafka server (broker), I made the following changes to <kafka root folder>\config\server.properties as highlighted and saved the file:

The above changes indicate:
Broker.id -> set to 1 - nothing particular - just felt like doing it. You can have multiple Kafka brokers by copying this properties file and changing the broker id.
Kafka broker (listener) will be available at localhost:9093
The Kafka logs directory is set to e:\temp\kafka-logs
Number of partitions per topic is set at 2 (will help us experiment with features - having just 1 partition is meh :D
Kafka server (broker) can now be started using the command:
$ bin/kafka-server-start.sh ./config/server.properties

Minimal Spring Boot app with Spring Kafka
Generate a Spring Boot app by using https://start.spring.io/. I have highlighted the options I chose when generating the app.

Once generated and downloaded, extract to a suitable location, import it to IntelliJ (New -> Module from Existing sources... -> Select the root folder of the extracted package).

Setting up essential properties
To connect to the Kafka broker, setup the following properties in src/main/resources/application.properties
spring.application.name=kafkademo
spring.kafka.bootstrap-servers=localhost:9093
spring.kafka.consumer.group-id=test-group-id
spring.kafka.consumer.topic=solobyte-kafka-primer-topic

spring.kafka.bootstrap-servers -> tells the broker server and port on which it's listening. Note that 9093 is the port we used in the server.properties for the Kafka broker.
spring.kafka.consumer.group-id -> the consumer group id that this Spring boot app will use for the consumer.
spring.kafka.consumer.topic -> topic name for the consumer to listen to. We will use the same topic name for the producer too.
Now for the minimal Spring Boot Consumer and Configuration classes.
Create a new package 'consumer' and add the following classes:
package org.solobyte.kafkademo.consumer;

import org.apache.kafka.clients.consumer.ConsumerConfig;
import org.apache.kafka.common.serialization.StringDeserializer;
import org.springframework.beans.factory.annotation.Value;
import org.springframework.context.annotation.Bean;
import org.springframework.context.annotation.Configuration;
import org.springframework.kafka.config.ConcurrentKafkaListenerContainerFactory;
import org.springframework.kafka.core.ConsumerFactory;
import org.springframework.kafka.core.DefaultKafkaConsumerFactory;

import java.util.HashMap;
import java.util.Map;

@Configuration
public class KafkaConsumerConfig {


    @Value("${spring.kafka.bootstrap-servers}")
    private String bootstrapServers;
    @Value("${spring.kafka.consumer.group-id}")
    private String consumerGroupId;

    @Bean
    public ConsumerFactory<String,String> consumerFactory(){
        Map<String,Object> configProps = new HashMap<>();
        configProps.put(ConsumerConfig.BOOTSTRAP_SERVERS_CONFIG, bootstrapServers);
        configProps.put(ConsumerConfig.GROUP_ID_CONFIG, consumerGroupId);
        configProps.put(ConsumerConfig.KEY_DESERIALIZER_CLASS_CONFIG, StringDeserializer.class);
        configProps.put(ConsumerConfig.VALUE_DESERIALIZER_CLASS_CONFIG, StringDeserializer.class);
        return new DefaultKafkaConsumerFactory<>(configProps);
    }

    @Bean
    public ConcurrentKafkaListenerContainerFactory<String,String> kafkaListenerContainerFactory(ConsumerFactory<String,String> consumerFactory){
        ConcurrentKafkaListenerContainerFactory<String,String> factory = new ConcurrentKafkaListenerContainerFactory<>();
        factory.setConsumerFactory(consumerFactory);
        return  factory;
    }

}
package org.solobyte.kafkademo.consumer;

import lombok.extern.slf4j.Slf4j;
import org.springframework.kafka.annotation.KafkaListener;
import org.springframework.stereotype.Component;

@Component
@Slf4j
public class KafkaConsumer {

    @KafkaListener(topics = "#{'${spring.kafka.consumer.topic}'}", groupId = "#{'${spring.kafka.consumer.group-id}'}")
    public void listen(String message){
        log.info("Received message => {}", message);
    }

}
The IntelliJ project workspace should look like this now:

Checkpoint
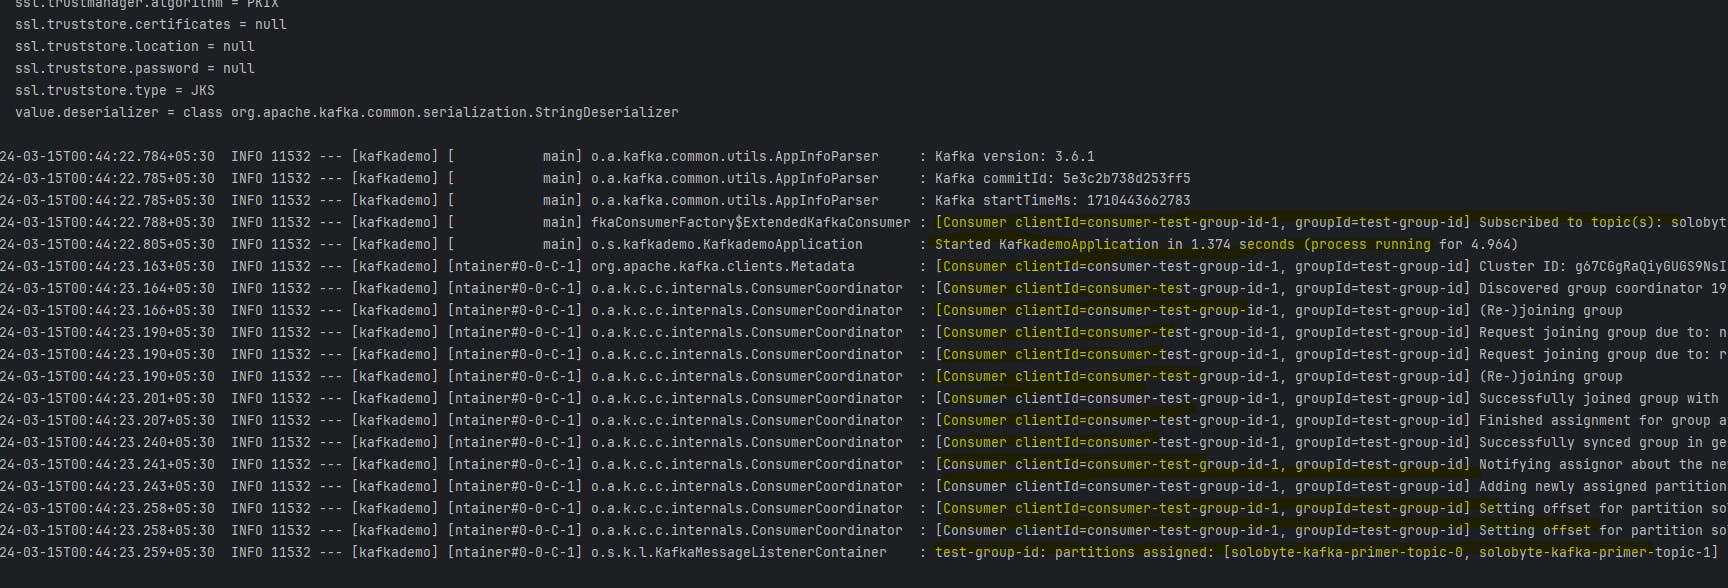
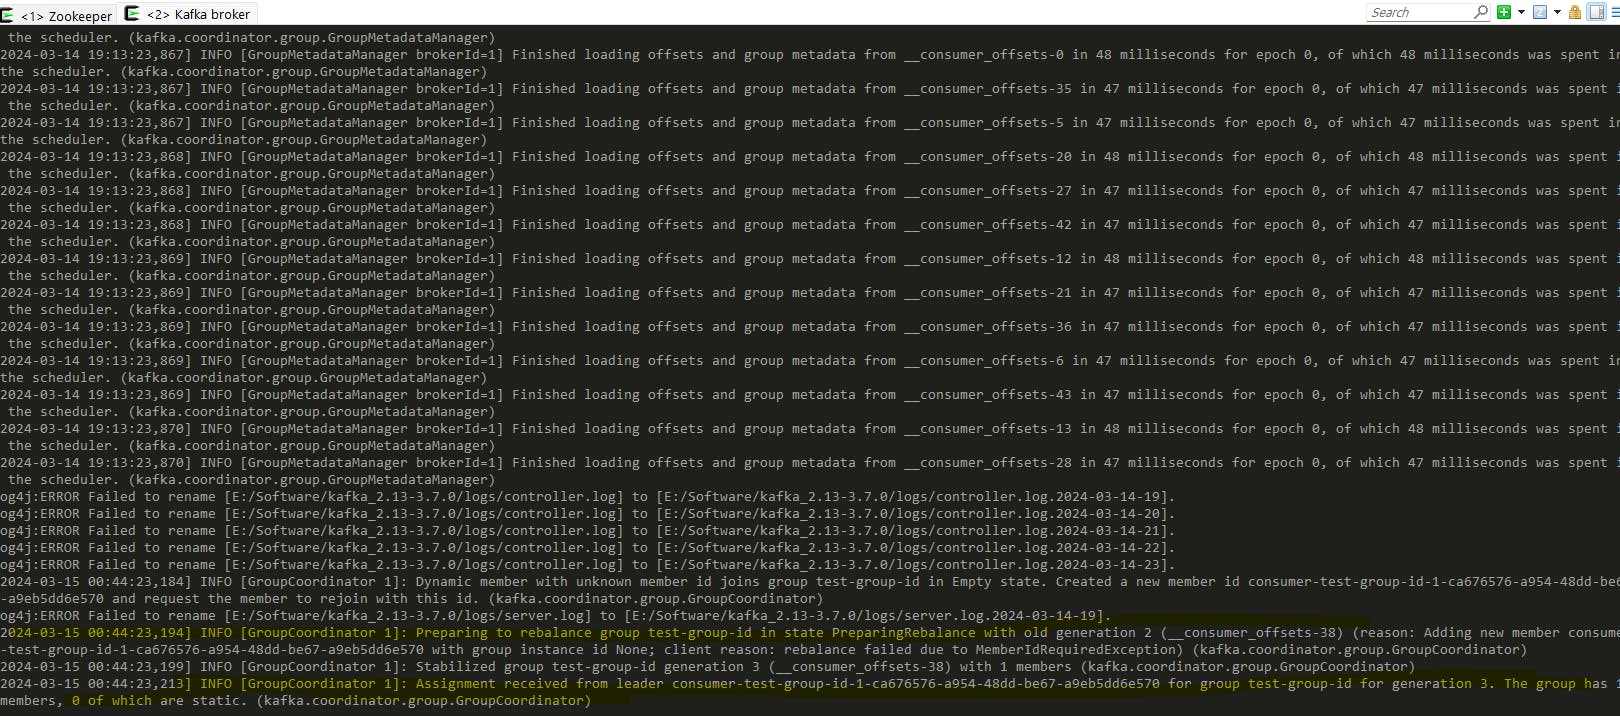
To see how we are doing so far, we can start the Spring Boot app now by right clicking on the main class KafkademoApplication and clicking 'Run'. Once the app starts, it will spit out some details and you should also see some activity in the console that's running the Kafka broker. The logs tell a lot about what's going on, so do give them a read:
IntelliJ Run console logs should be similar to:
Kafka broker console should look similar to:
At this point, the Spring Boot app is running, and the consumer is listening for messages on the configured topic. How do we know for sure? We can verify the topic exists and send a sample message using some command line magic.
Open another terminal/console and from the root of the Kafka folder, try running the following command:
$ bin/kafka-topics.sh --describe --topic solobyte-kafka-primer-topic --bootstrap-server localhost:9093
Topic: solobyte-kafka-primer-topic      TopicId: x-88wI96RZucRL3klLBHLA PartitionCount: 2       ReplicationFactor: 1    Configs:
        Topic: solobyte-kafka-primer-topic      Partition: 0    Leader: 1       Replicas: 1     Isr: 1
        Topic: solobyte-kafka-primer-topic      Partition: 1    Leader: 1       Replicas: 1     Isr: 1
If you see the topic details, we are good to send a few messages and checking on IntelliJ Run terminal if we received the message!
bin/kafka-console-producer.sh --topic solobyte-kafka-primer-topic --bootstrap-server localhost:9093
After entering the command, wait till you get the '>' prompt

Now we are ready to send single line messages. It could be anything. Try a few messages and check if it shows up in the IntelliJ console.

If the messages show up, congrats - we have reached 1/4th of our journey :)

Now for the Spring Boot producer part. we create 2 new classes for - you guessed it - a config and an actual message producer. Also, we create a controller class just so that we can invoke the message producer using cURL.
package org.solobyte.kafkademo.producer;

import org.apache.kafka.clients.producer.ProducerConfig;
import org.apache.kafka.common.serialization.StringSerializer;
import org.springframework.beans.factory.annotation.Value;
import org.springframework.context.annotation.Bean;
import org.springframework.context.annotation.Configuration;
import org.springframework.kafka.core.DefaultKafkaProducerFactory;
import org.springframework.kafka.core.KafkaTemplate;
import org.springframework.kafka.core.ProducerFactory;

import java.util.HashMap;
import java.util.Map;

@Configuration
public class KakfkaProducerConfig {

    @Value("${spring.kafka.bootstrap-servers}")
    private String bootstrapServers;

    @Bean
    public ProducerFactory<String, String> producerFactory() {
        return new DefaultKafkaProducerFactory<>(producerConfigs());
    }

    @Bean
    public Map<String, Object> producerConfigs() {
        Map<String, Object> props = new HashMap<>();
        props.put(ProducerConfig.BOOTSTRAP_SERVERS_CONFIG, bootstrapServers);
        props.put(ProducerConfig.KEY_SERIALIZER_CLASS_CONFIG, StringSerializer.class);
        props.put(ProducerConfig.VALUE_SERIALIZER_CLASS_CONFIG, StringSerializer.class);
        return props;
    }

    @Bean
    public KafkaTemplate<String, String> kafkaTemplate() {
        return new KafkaTemplate<String, String>(producerFactory());
    }
}
package org.solobyte.kafkademo.producer;

import lombok.extern.slf4j.Slf4j;
import org.springframework.beans.factory.annotation.Autowired;
import org.springframework.beans.factory.annotation.Value;
import org.springframework.kafka.core.KafkaTemplate;
import org.springframework.stereotype.Component;

@Slf4j
@Component
public class KafkaProducer {

    @Autowired
    private KafkaTemplate kafkaTemplate;

    @Value("${spring.kafka.consumer.topic}")
    private String topic;


    public String sendToKafka(String message) {

        try {
            if(message!=null){
                kafkaTemplate.send(topic, message);
                return "Message published successfully";
            }else{
                return "Empty message. Nothing to send!";
            }

        } catch (Exception ex) {
            return "Error sending message";
        }

    }

}
package org.solobyte.kafkademo.api;

import lombok.extern.slf4j.Slf4j;
import org.solobyte.kafkademo.producer.KafkaProducer;
import org.springframework.beans.factory.annotation.Autowired;
import org.springframework.web.bind.annotation.PostMapping;
import org.springframework.web.bind.annotation.RequestBody;
import org.springframework.web.bind.annotation.RestController;

@RestController
@Slf4j
public class MessageSender {

    @Autowired
    private KafkaProducer messageProducer;

    @PostMapping("/api/send/")
    public String publishMessage(@RequestBody String message) {
        log.info("Sending message to Kafka: {}", message);
        return messageProducer.sendToKafka(message);
    }

}
The project structure should now look like:

Checkpoint
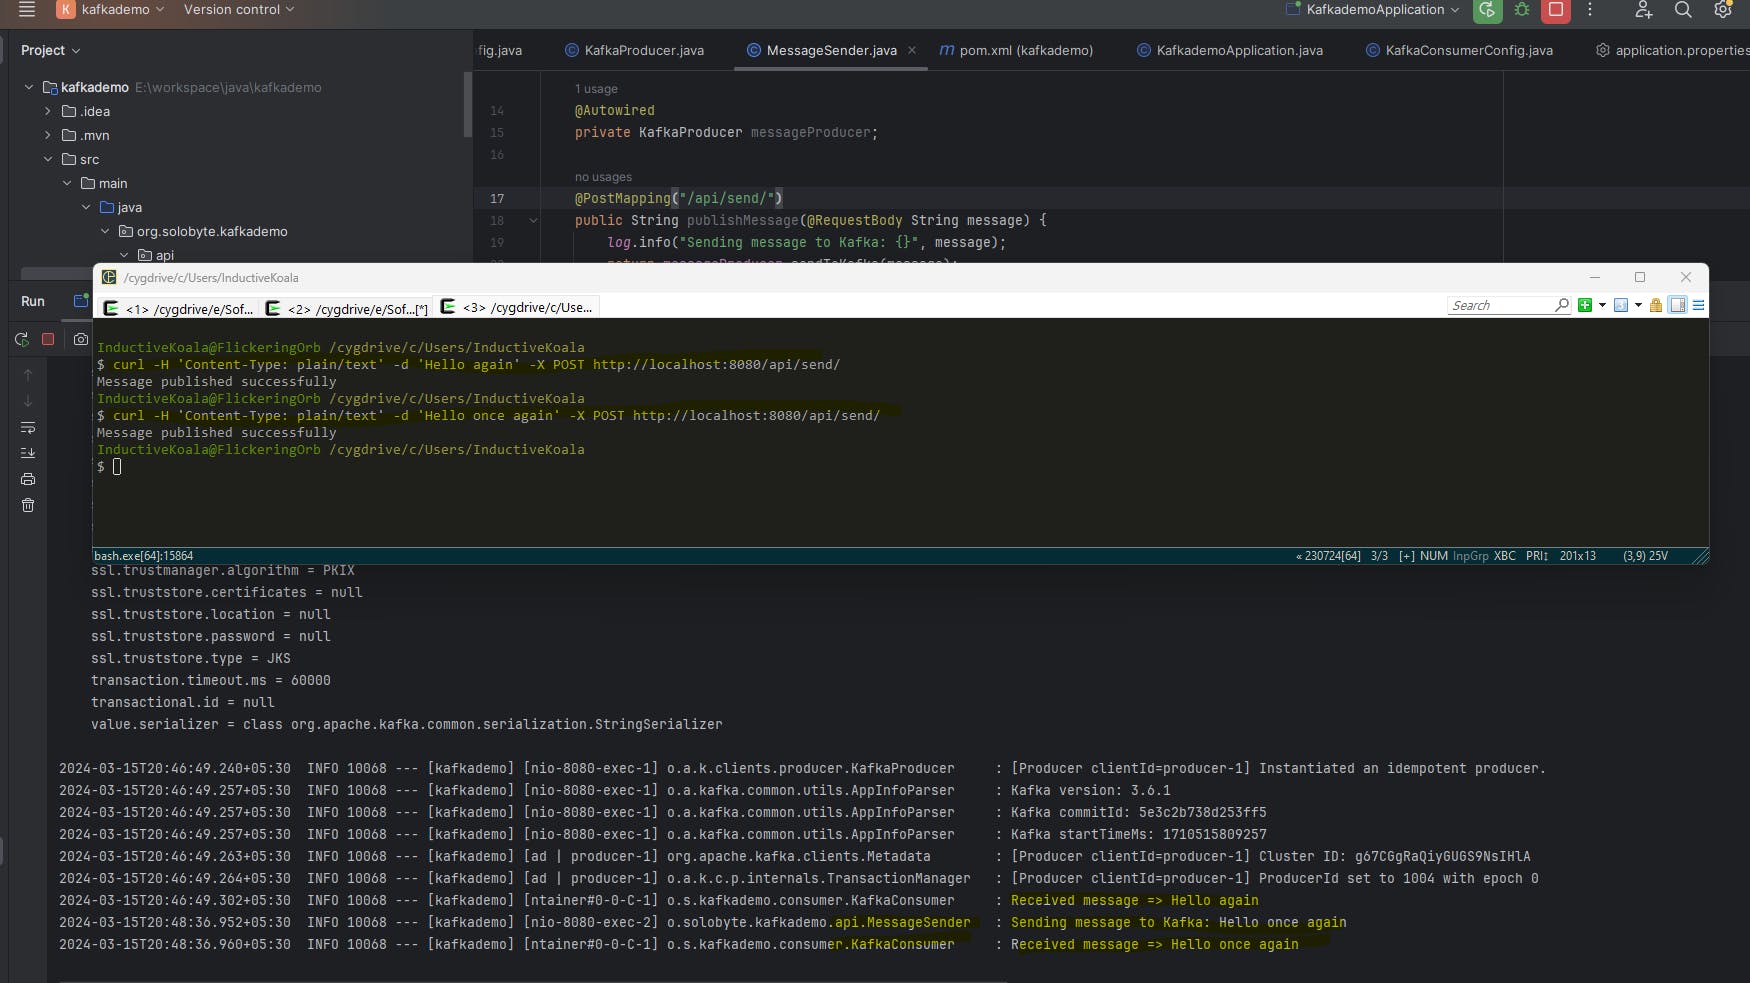
Let's run this app now and invoke the api using cURL

Let's try the api by running the following from a command line:
$ curl -H 'Content-Type: plain/text' -d 'Hello again' -X POST http://localhost:8080/api/send/
Just to recap, if you have reached this far, you have successfully:
Run Kafka locally
Setup a minimal Spring boot app
Sent messages from Kafka command line utilities
Set up Consumer config and listener classes
Set up producer config and sender classes
Created API to send messages
Used cURL to send messages which are then forwarded by the Spring Producer to Kafka and is consumed by the same app.
However, producing and consuming messages in the same app is not that exciting. Let's take it a step further and introduce Python module that will receive these messages and send back messages too!
Python modules
Install kafka-python
$ pip install kafka-python
Defaulting to user installation because normal site-packages is not writeable
Collecting kafka-python
  Downloading kafka_python-2.0.2-py2.py3-none-any.whl.metadata (7.8 kB)
Downloading kafka_python-2.0.2-py2.py3-none-any.whl (246 kB)
   ━━━━━━━━━━━━━━━━━━━━━━━━━━━━━━━━━━━━━━━━ 246.5/246.5 kB 2.5 MB/s eta 0:00:00
Installing collected packages: kafka-python
Successfully installed kafka-python-2.0.2
We'll use VSCode for the Python part.
In a folder of your choice, create an empty file kafkaConsumer.py and add the following code
from kafka import KafkaConsumer
consumer = KafkaConsumer('solobyte-kafka-primer-topic',
                         group_id='test-group-id',
                         bootstrap_servers=['localhost:9093'])
for message in consumer:
    print ("%s:%d:%d: key=%s value=%s" % (message.topic, message.partition,
                                          message.offset, message.key,
                                          message.value))
Your workspace should be similar to:
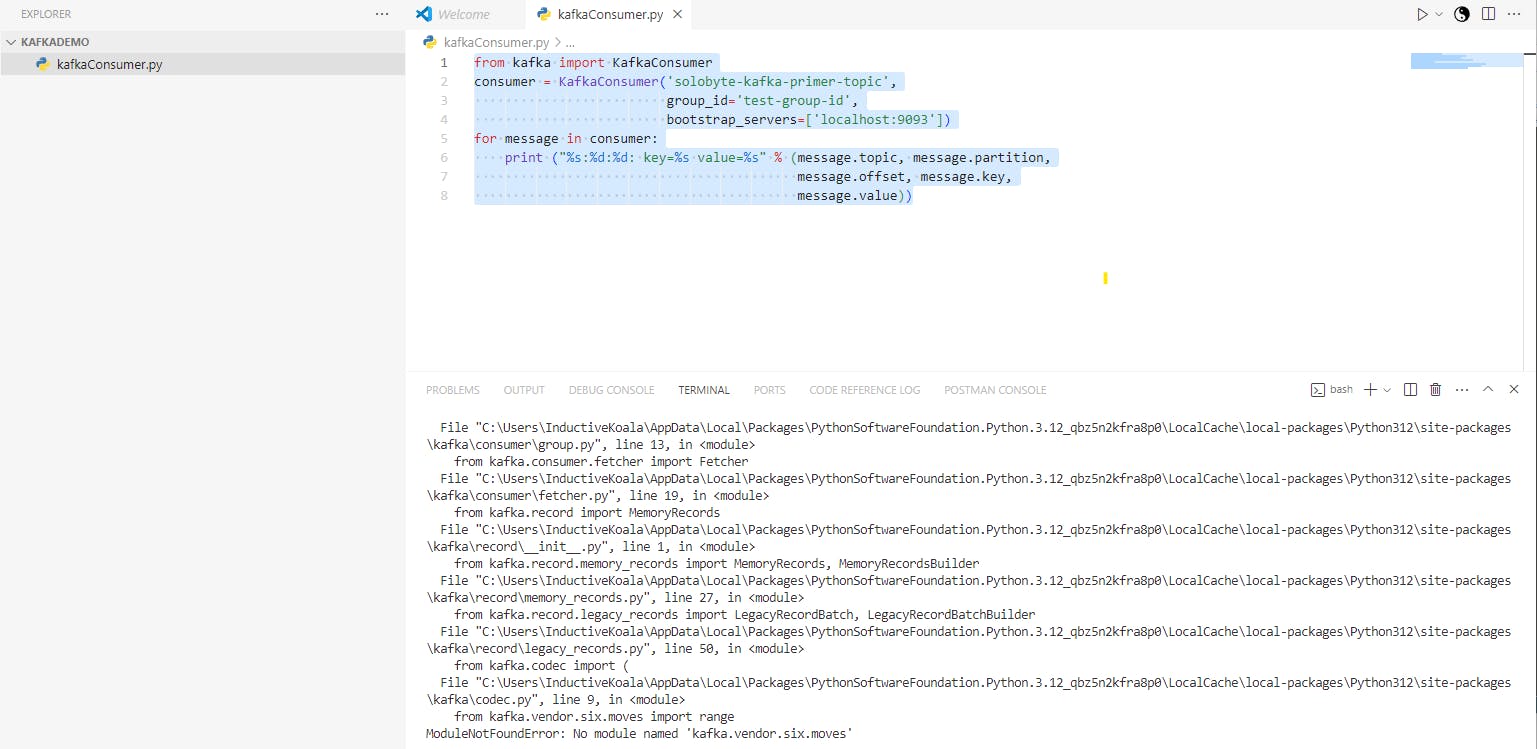
You may notice the following error when trying to run the script:
$ python kafkaConsumer.py
Traceback (most recent call last):
  File "E:\workspace\python\kafkademo\kafkaConsumer.py", line 1, in <module>
    from kafka import KafkaConsumer
  File "C:\Users\InductiveKoala\AppData\Local\Packages\PythonSoftwareFoundation.Python.3.12_qbz5n2kfra8p0\LocalCache\local-packages\Python312\site-packages\kafka\__init__.py", line 23, in <module>
    from kafka.consumer import KafkaConsumer
  File "C:\Users\InductiveKoala\AppData\Local\Packages\PythonSoftwareFoundation.Python.3.12_qbz5n2kfra8p0\LocalCache\local-packages\Python312\site-packages\kafka\consumer\__init__.py", line 3, in <module>
    from kafka.consumer.group import KafkaConsumer
  File "C:\Users\InductiveKoala\AppData\Local\Packages\PythonSoftwareFoundation.Python.3.12_qbz5n2kfra8p0\LocalCache\local-packages\Python312\site-packages\kafka\consumer\group.py", line 13, in <module>
    from kafka.consumer.fetcher import Fetcher
  File "C:\Users\InductiveKoala\AppData\Local\Packages\PythonSoftwareFoundation.Python.3.12_qbz5n2kfra8p0\LocalCache\local-packages\Python312\site-packages\kafka\consumer\fetcher.py", line 19, in <module>
    from kafka.record import MemoryRecords
  File "C:\Users\InductiveKoala\AppData\Local\Packages\PythonSoftwareFoundation.Python.3.12_qbz5n2kfra8p0\LocalCache\local-packages\Python312\site-packages\kafka\record\__init__.py", line 1, in <module>
    from kafka.record.memory_records import MemoryRecords, MemoryRecordsBuilder
  File "C:\Users\InductiveKoala\AppData\Local\Packages\PythonSoftwareFoundation.Python.3.12_qbz5n2kfra8p0\LocalCache\local-packages\Python312\site-packages\kafka\record\memory_records.py", line 27, in <module>
    from kafka.record.legacy_records import LegacyRecordBatch, LegacyRecordBatchBuilder
  File "C:\Users\InductiveKoala\AppData\Local\Packages\PythonSoftwareFoundation.Python.3.12_qbz5n2kfra8p0\LocalCache\local-packages\Python312\site-packages\kafka\record\legacy_records.py", line 50, in <module>
    from kafka.codec import (
  File "C:\Users\InductiveKoala\AppData\Local\Packages\PythonSoftwareFoundation.Python.3.12_qbz5n2kfra8p0\LocalCache\local-packages\Python312\site-packages\kafka\codec.py", line 9, in <module>
    from kafka.vendor.six.moves import range
ModuleNotFoundError: No module named 'kafka.vendor.six.moves'
This seems to be a known issue (https://github.com/dpkp/kafka-python/issues/2412) and is resolved by running:
$ pip install git+https://github.com/dpkp/kafka-python.git
Now, rerun the Python script and it should be able to receive message sent to the API
(You should have Zookeeper, Kafka broker, the Spring Boot app and Python script all running)

Notice that on issuing the API, the Python app received the message, but not the Spring Boot App. Why? Hint*: Consumer group ids are same for both the apps*.
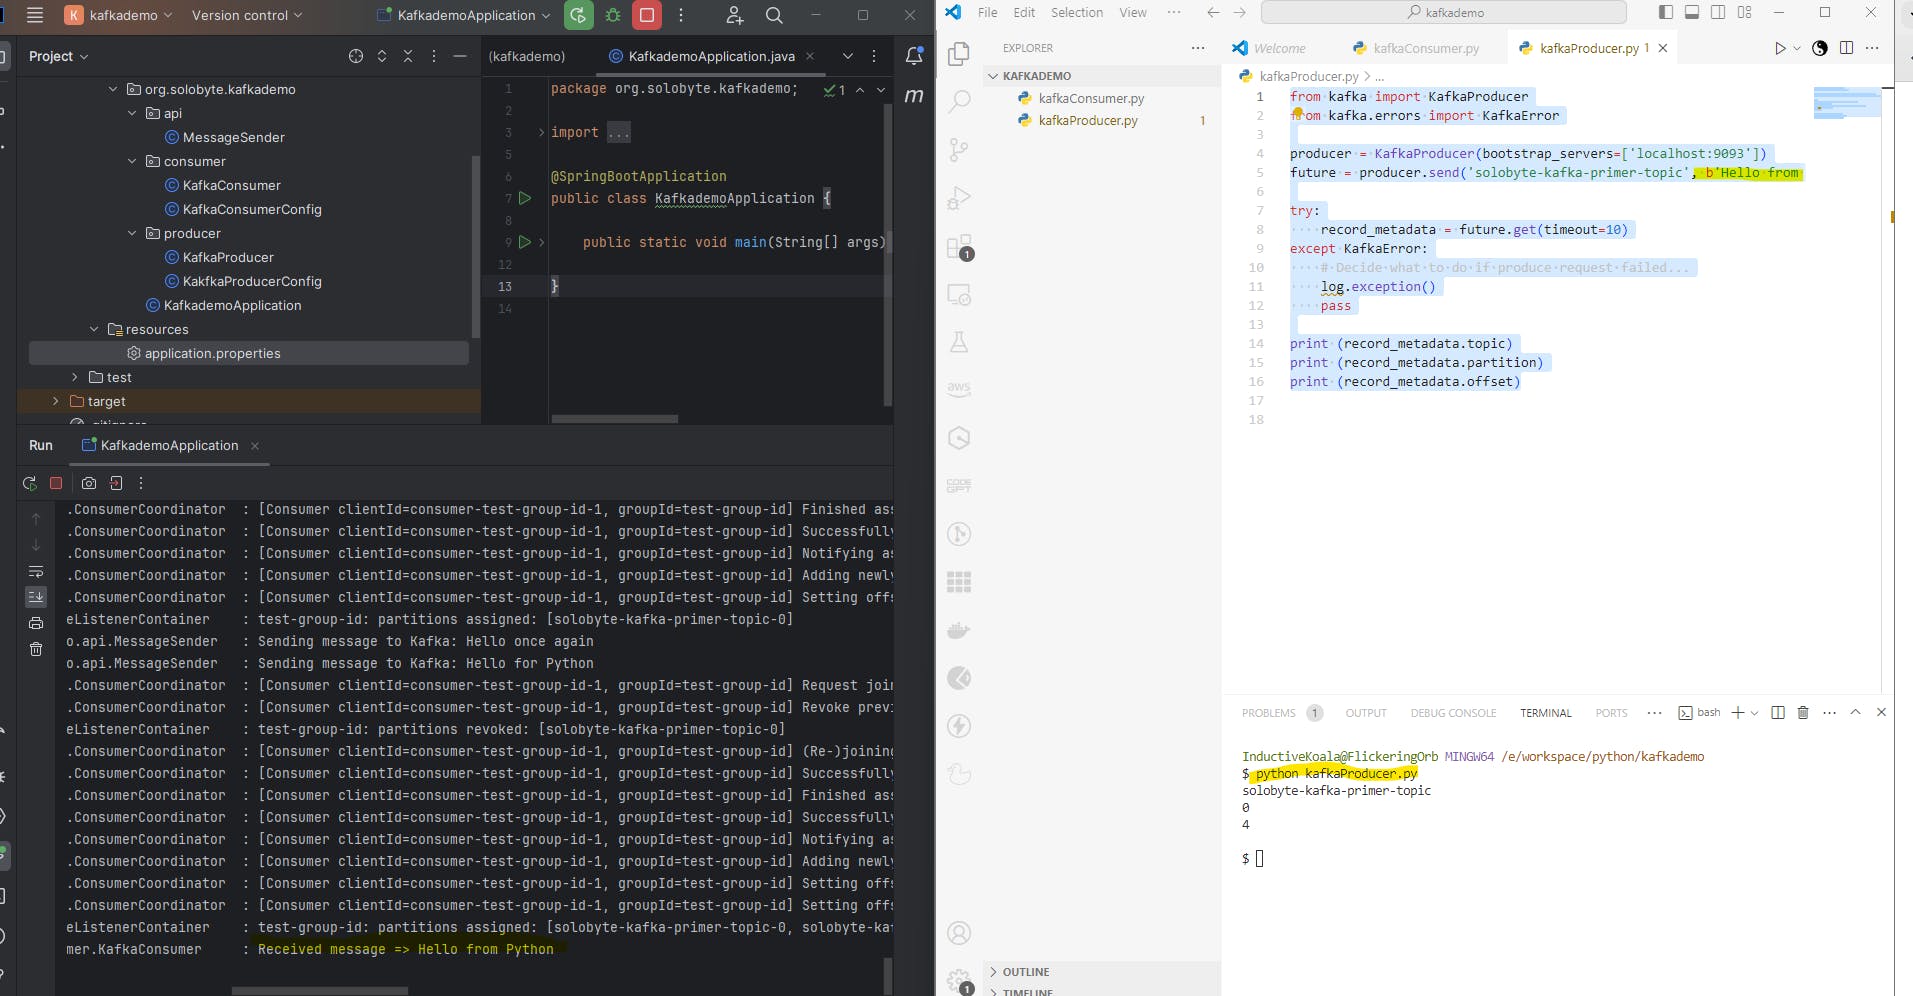
Now, the last piece: A python message producer to send messages to our Kafka broker:
from kafka import KafkaProducer
from kafka.errors import KafkaError

producer = KafkaProducer(bootstrap_servers=['localhost:9093'])
future = producer.send('solobyte-kafka-primer-topic', b'Hello from Python')

try:
    record_metadata = future.get(timeout=10)
except KafkaError:
    # Decide what to do if produce request failed...
    log.exception()
    pass
Run this using:
$ python kafkaProducer.py
..and you should see the message received in Spring Boot app console
Please feel free to explore this wonderful combination. Some ideas:
Stop Zookeeper and check what happens.
Start Zookeeper, but stop the Kafka Broker
Experiment with consumer groups and number of partitions.
Experiment with the numerous parameters available for Producers and Consumers
Also, this being my first post would really like your review/comments and please feel free to drop me a note if you see any obvious issues/errors.
Thanks again for stopping by!